 "RamblinRover Luxury-Yacht" (ramblininexile)
11/23/2015 at 10:27 • Filed to: None
 2
2
 17
17|
"RamblinRover Luxury-Yacht" (ramblininexile)
11/23/2015 at 10:27 • Filed to: None | 2
| 17 |
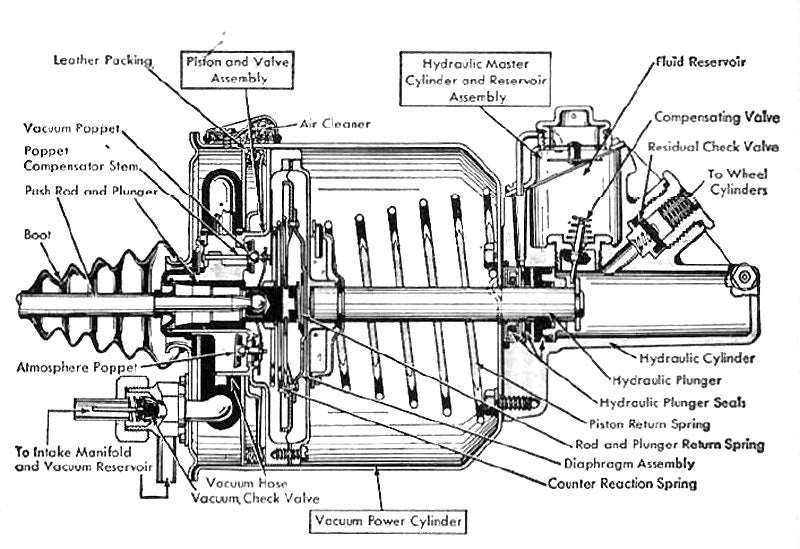
Separate cylinder? Heh. Diaphragm actuation? Pfeh. A Jedi craves not these things.
(This system, provided by Bendix along with many other parts of a brake system, was one of the early and most popular booster setups for the power brakes of the fifties. Used by GM, FoMoCo, Packard, and others. It was superseded by in-house offerings because... well, it has some issues.)
|
RamblinRover Luxury-Yacht
> RamblinRover Luxury-Yacht
11/23/2015 at 10:32 |
|
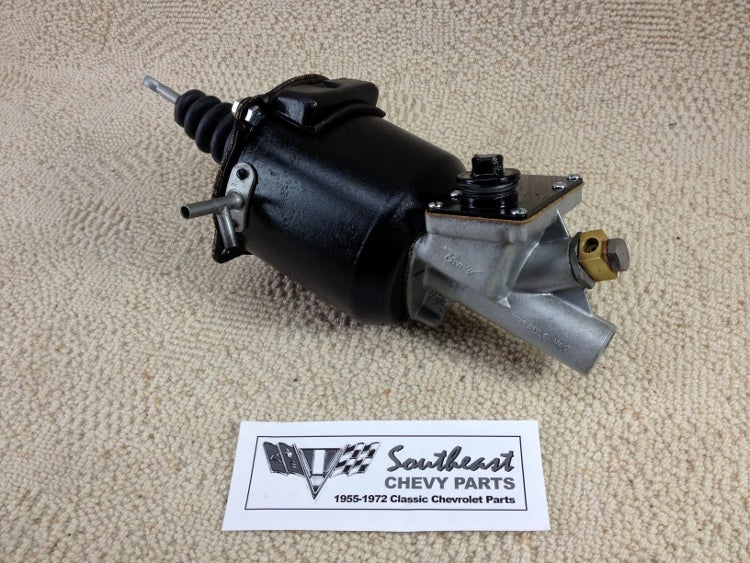
Reman Treadle-Vac units cost in the neighborhood of $400. No big surprise for sixty year old brake tech. Big core charges are involved, as well.
 RallyWrench
> RamblinRover Luxury-Yacht
RallyWrench
> RamblinRover Luxury-Yacht
11/23/2015 at 12:14 |
|
My Lancia uses a Bonaldi of similar complexity. There is one guy in America who can do them right, from what I’ve gathered. Otherwise I have to ship it to the UK. I kind of want to take it apart myself though.
|
RamblinRover Luxury-Yacht
> RallyWrench
11/23/2015 at 12:20 |
|
I figure I’ll rebuild my own. Although, the temptation to modify the output shaft to drive a less dumb master cylinder may strike. As I see it, it’s not like the booster is capable of failing all at once - unlike a modern diaphragm one, and if it leaks a little it leaks. The master cylinder is the only real weak link here, even if the booster is... not simple.
 JR1
> RamblinRover Luxury-Yacht
JR1
> RamblinRover Luxury-Yacht
11/23/2015 at 14:09 |
|
Holy crap. Does not sound cheap and looks pretty complicated
|
RamblinRover Luxury-Yacht
> JR1
11/23/2015 at 14:24 |
|
One odd thing about this setup is that the cylinder return is handled in the booster. Most master cylinders, even ones that function similarly, have a return spring because the plunger isn’t permanently fixed to the booster. Like this one:

(Land Rover “CB” style)
|
JR1
> RamblinRover Luxury-Yacht
11/23/2015 at 15:46 |
|
I suppose it is just because the system is more antiquated that it is so odd?
|
RamblinRover Luxury-Yacht
> JR1
11/23/2015 at 16:16 |
|
There are many ways to make a booster. Modern ones are pretty universally one way because it’s cheap, involves fewer parts, and works - though it depends on good quality materials and good quality control very strongly. To happen, a umber of minor changes had to occur first, and then it *became* the simple, “correct” solution. A lot of invention is that way - it takes iteration through a bunch of complicated solutions before somebody finds a good simple one, so sometimes technological “Advancement” looks from the outside like it’s going backward.
This setup here - for a brake system that requires a pretty long travel, the logical jump to a diaphragm didn’t suggest itself. A diaphragm stretching over 1” of travel can move the same amount of fluid in a 1” cylinder as a 5/8” cylinder moving over 2 1/2”. An older system, non-power, is more likely to look like the second of those two, and for that much travel, a cylinder with a piston in it for the booster seems to make more sense. “Fixing” things so that more mechanical advantage and less cylinder travel were involved had to happen first, to make a diaphragm booster possible... and that’s just one part of all this!
All this isn’t to say this is a bad design as such. When it’s working properly, the travel to engage power is almost nothing (no pedal sloppiness), and it’s very precise - not “grabby” at all, really, and the response/applied power is very linear. It’s also compact - a lot of cars converting away from the Bendix booster need a fancy adapter to put the booster sideways, because this system doesn’t take up much firewall real estate. It’s also good for relatively simple pedal geometry - some other systems for actuating a “normal” booster would be less so.
 Mattbob
> RamblinRover Luxury-Yacht
Mattbob
> RamblinRover Luxury-Yacht
12/02/2015 at 10:48 |
|
Just saw this post. I work with a bunch of old Bendix vacuum booster guys. I will have to ask if it looks familiar to them. I don’t think they are thaaat old though.
|
RamblinRover Luxury-Yacht
> Mattbob
12/02/2015 at 10:55 |
|
I’ve got one on my Lincoln I’m going to have to rebuild. I may rework it to replace the master cylinder with another setup, but the cranky leather-seal piston buffoonery shall stay.
|
Mattbob
> RamblinRover Luxury-Yacht
12/02/2015 at 11:07 |
|
Yeah, having a secondary circuit might be a nice thing to have if you can manage it.
|
RamblinRover Luxury-Yacht
> Mattbob
12/02/2015 at 11:16 |
|
The reasons being, 5000lb+ car with well over 300hp and a 120+ top speed... and single circuit drums on the above, which apparently the valves sometimes fail in.
 4muddyfeet - bare knuckle with an EZ30
> RamblinRover Luxury-Yacht
4muddyfeet - bare knuckle with an EZ30
> RamblinRover Luxury-Yacht
12/03/2015 at 12:04 |
|
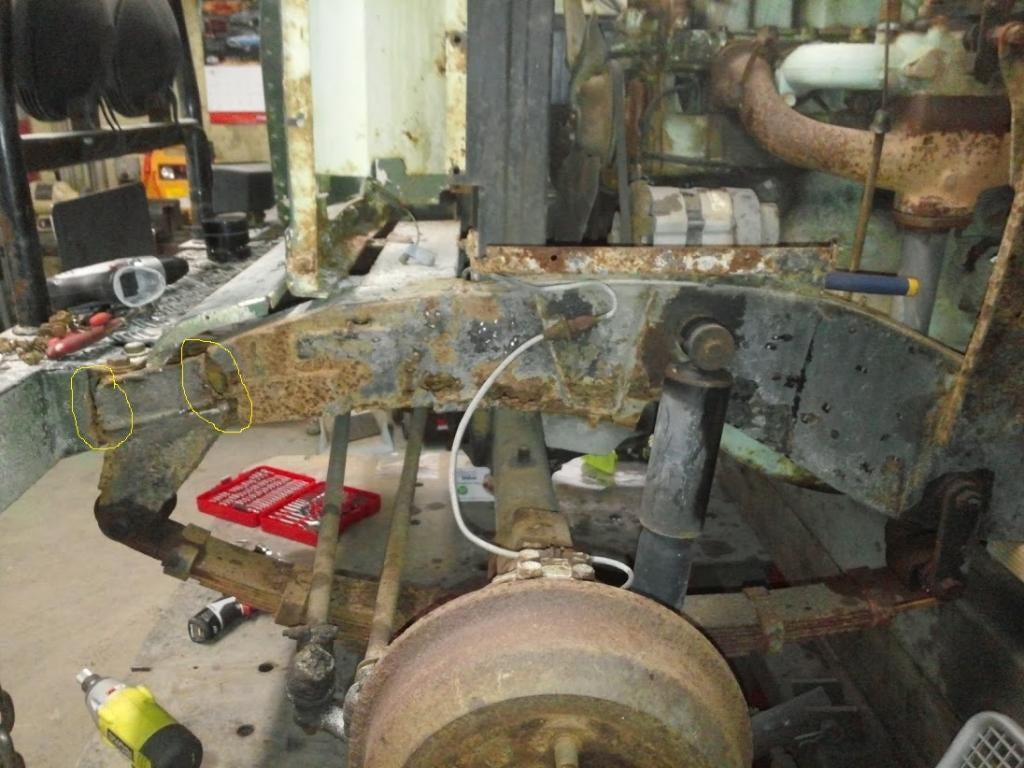
Okey dokey Hello and What What Old Bean. The outriggers on the Series are shot to shit. After cleaning up the chassis the frame is actually OK, but I managed to punch holes in three of the outriggers with a good tap from a brick hammer. They’ve rotted from the inside out, so; they need replacing. BUT although the outriggers are a cheap job, and the frame seems thin in places but is structurally sound (no visible deformation under stress from a 16oz ball pien), would it still be worth getting a new galvy put in? I’m not sure if the body needs to be off for outriggers(?), but if so, and considering the fact that I need to replace the leafies and a fuel tank, a new fresh shiny lovely chassis is starting to make some sense, if not financially. It would be nice to work through the whole car from the chassis up, even if it’s just replacing bolts and cleaning bits up.
|
RamblinRover Luxury-Yacht
> 4muddyfeet - bare knuckle with an EZ30
12/03/2015 at 12:31 |
|
Horrifying, but not surprising. It’s the whole-box closed style bulkhead outriggers that are rotted, right? The other one that rots is the one behind the fuel tank, typically down toward the bottom and on the flange, but that one’s far worse in an 88 for being near the wheel. Check it anyway. I do know the AllMakes outriggers have a bunch of extra steel each side to weld into even a slightly compromised chassis, so you shouldn’t have any issues there.
Option 1: doing fresh outriggers
As to whether the body needs to be off, absolutely not. It wouldn’t hurt to get that side floorboard, rocker trim, and rocker brace all off to get out of your way. but the forward braces (steering box and the other side) are well capable of holding the bulkhead mostly in place while it’s loose from the outrigger. I haven’t replaced an outrigger in situ, but I have done door posts and toe boards that way, which is arguably trickier and similar. The thing to remember is that the bulkhead likes to draw up toward center when unmoored, so you’ll need your measurement to the outrigger outer hole beforehand (I’d recommend inside of chassis to outrigger hole measurement) so you can prevent that from happening and cocking up your door alignment. Also measure front/back and be certain to get them square/level to the frame rail and front to back, because otherwise you’ll be using shim washers and/or prybars (may do that anyway) and maybe even taking loose the door hinges to realign. May do that anyway. Anyway, I’ve done outriggers multiple times, but on a stripped chassis, so I can only tell you how it should work in theory that way.
Option 2: new chassis
Sounds easy to do in a lot of respects, but you’ll likely find yourself in a quagmire. Makes for a nicer vehicle, to be certain, but you *will* go mad (okay, madder) trying to get everything back on and properly aligned, and you’ll run through questions of whether to replace the rear bed cushion pads, needing to repaint parts, fighting door alignment, and worst of all, getting the steering box and its brackets right, though that’s more of a problem with LHD. As an illustration - brand new chassis for my cousin’s needed whole sessions of prying on things, hammering on things, and even my dad sitting on one corner while I did up bolts just to get the rear bucket on straight. All said and done, on a supposedly very correctly jigged chassis, there ended up being nearly 1/8” difference in door opening length between left and right, after much fighting to bring it that near, and with one opening slightly more square than the other. That, and do they offer the mil-style rear crossmember in galvy? This all may sound like I’m tearing down the idea, but fresh galvy chassis are very, very nice to have.
Further, this is still very possibly the best option if you’ve got rot in your front chassis horns back and to/around the front crossmember. That bit’s not very great fun to fix. I myself Frankensteined a 109SW chassis together from an acceptable front cut off a deeply rotted rear, a fresher rear from a 109 pickup, a lot of cross-located brackets, and a great deal of fresh metal including two front horns, a 2nd-from-rear crossmember and two outriggers, and gusset plates for the splice. I’d do it again, too, but that was looking at a project that was a complete teardown required regardless of whether it was new or fresh, which I don’t think will be the case for you. In addition, it was a few hundred dollars to get that whole lump hot-dipped in the next state, so it really *was* a fresh galvy chassis, just not a new one as such. We’ll see how it goes.
|
4muddyfeet - bare knuckle with an EZ30
> RamblinRover Luxury-Yacht
12/03/2015 at 13:06 |
|
Yes it’s the fully enclosed outriggers, and as you say, it’s the two front bulkhead units and RHS rear of tank mount. They look original, so that doesn’t fill me full of joy regarding the state of the inside of the main frame. How do you tell??
Richards Chassis’ offer a mil-spec chassis with oil cooler mount, 3” extensions for leaf springs, mil cross member, twin front tank brackets and optional rear tank brackets, bolt up cross member holes and under chassis tow ring holes. Fully galvanised and delivered for Ł1,920.
The body is pretty damn straight, so I would hope that I’m left with jimmy barring rather than extensive hammering, but that being said it is something I’d consider having done externally. I think I was quoted Ł700 for a body re-fit non-inclusive of other necessary replacement parts (there will be some, I’m sure). It’s a bunch of guys that I trust too.
Realistically I’d be looking at Ł3k, but she would be back OTR for Summer. I’m now not bothered about retaining value, there’s not much left anyway! So this is very much a labour of love, and it’s either have the work done and the chassis will be good forever, or keep on repairing and replacing until the day it really dies.
Also, I can find no info whatsoever on that MOD rollcage that I have, not even a Google Image. This is a problem considering there are mounts for two pieces that I dont have. One I assume is for a central hoop for the canvas, the other extends 3” out from the front rollbar above the height of the window frame towards the windscreen. Either a support bracket from the windscreen to rollbar for the canvas, or an add-on piece to aid the door seal at the top of the window frame (not even joking, if you remember the front roll bar has a welded in bracket with a door seal on it) Assuming it is (was) a specific role vehicle, it’s impossible to get these parts, and even quite tough just finding out exactly WTF is supposed to be there.
|
RamblinRover Luxury-Yacht
> 4muddyfeet - bare knuckle with an EZ30
12/03/2015 at 13:42 |
|
There’s a gusset reinforcing in the middle stretches of the frame on a 109. Should be detectable by faint spot weld marks. If that sounds off at all when tapped, or has poke-through rust in a corner, that’s your canary in the coal mine - it’s a metal sandwich, and will have held moisture more than anywhere else in the frame rails. If that and the bottom plate of the frame seem alright, you’re probably not in trouble, yet.
I’m not sure you’ll be back into the chassis anytime soon if you get the fix done right and properly, but it’s all up to you. Just figured I’d detail the options and how they’d work.
The MOD cage does interest me, if for no other reason than I’d like to do up a bar for my cousin’s one. I’m guessing you’re probably best off trying to find the door top seal pieces for a standard canvas and working from them how to connect to the bar. The central hoop probably resembles the one for a standard 109 long canvas as well...
|
4muddyfeet - bare knuckle with an EZ30
> RamblinRover Luxury-Yacht
12/03/2015 at 14:28 |
|
I should be able to get it up on a lift before Xmas, with proper lighting too, so then I can listen to the chassis hark it’s death knell.
Thanks Rover bro.
|
RamblinRover Luxury-Yacht
> 4muddyfeet - bare knuckle with an EZ30
12/03/2015 at 14:50 |
|
The one I hacked up to make a new one out of wasn’t all bad there, but there was a bad spot underneath that point on one side and 2/4 gussets had readily detectable issues at the edges including a hole all the way through, so granting that’s both a low spot in the frame and a sandwiched corrosion magnet that I’ve seen in action, I assume it’s a pretty good warning lamp.
Here’s an example of baddish front horn rust:
Found this on the forums of a US parts-supplier. In addition to the bit where some fool welded a splice on up front, there’s a rusted crack visible over where the bump stop sits, and that the sort of thing that should be watched out for, though a little of that isn’t immediate death sentence. You can sometimes also see such over-weld jagged rust cracks where the bulkhead/steering brackets bolt through, and at the apex of the frame curvatures behind the front wheel and in front of the rear.
Basically, I’ve seen four Rover frames outright destroyed and three damaged. One destroyed was through moisture and earth contact, two damaged through long muddy life in the third world, one through driving in damp and sometimes road-salted western North Carolina, and three destroyed in combination of salt and sitting out of doors - New Hampshire and 2x Wisconsin. The NH frame was basically a plow truck and a write-off, and one of the WI frames (mine) was winter beater abused beyond belief. Gaping holes through the rear floor, even. The other WI frame was the one that made a front frame half partial donor - 109”. The bottom line is that no two frames go out identically.